
“Ribbert”
by Phineas Huckleberry

"Ribbert," an original frog figure from Knott's Bear-y Tales, is a cherished relic of the park's whimsical past. Likely a static figure, Ribbert's exact role in the ride remains a mystery, though several photos from Toadville feature similar frogs, hinting at his possible origins. Over the years, Ribbert has endured the wear and tear of time, especially during the 1980s and 1990s when neglect took its toll. Now, at 50 years old, Ribbert is finally receiving the restoration he deserves, bringing a wave of nostalgia and excitement to fans of the classic ride.
The frogs from Knott's Bear-y Tales have become iconic symbols of the ride, and owning one is a rare and cherished opportunity. Ribbert, in particular, holds a special place in my heart as he was gifted to me, making him even more precious. Despite having only one vivid memory of the attraction, the frogs have become a core part of my childhood playhouse memories. Their whimsical presence and charming design left an indelible mark on my imagination, making Ribbert's restoration a deeply personal and meaningful project.
The restoration process has been a meticulous endeavor, aimed at investigating his construction and addressing the issues caused by decades of neglect. Using knowledge from hours of research into art conservation, each step utilizes techniques to protect as much of the original condition underneath the new work. This project not only honors the legacy of Knott's Bear-y Tales but also serves as a testament to the enduring appeal of classic theme park attractions. As Ribbert is restored to his former glory, he promises to enchant and delight a new generation of fans, preserving the magic of Knott's Berry Farm’s “Old Time Adventure” for years to come.

Repairing Right Hand:
Assessment: The right hand was missing a finger, and another finger was detached.
Recreation: To recreate the missing finger, a wire hanger of the same gauge as the original wire was used. The hanger was cut to the same length as the detached finger.
Bead Replacement: Although a 12mm wooden bead with a 2.5mm hole was not available, a 10mm plastic bead was used instead. The hole in the bead was drilled to fit the wire.
Examining the Left Hand:
Removing Wrist Cuff and Webbing: The left hand had a crude wrist cuff and webbing, which were removed as they served no purpose. These parts were stored for provenance.
Removing Grey Compound: Underneath the cuff and webbing was a 1/4-inch layer of grey compound. After investigating its function and finding none, it was removed to return to the original surface.
Finger Attachment Investigation: Attention was then turned to understanding how the fingers were attached to the hand.
Armature Investigation:
Arm Connection: The armature was straightened revealing a connection loop, just below the elbow joint.
Forearm Removal: Beads were removed, and the finger wires were straightened, allowing the connection loop to be pulled from the forearm. A hand armature was attached on the other side -a wire forming the connection loop and the middle finger, with two smaller lengths of wire welded to it.
Cleaning and Reattachment:
Cleaning Wires: The process was repeated for the other hand. All wires were cleaned using a bristle brush to remove rust.
Reattaching Fingers: The original and new finger were reattached by wrapping the wires with thin jewelry wire to minimize bulk. The hand armature was placed back through the forearm and reconnected to the armature.
Final Adjustments: The fingers were bent back into their original shape, and beads were affixed to complete the restoration.


Removing Ribbert’s Eyes:
Initial Removal: The eyes were carefully removed from Ribbert's head. They were originally held in place with hot glue, which needed to be taken off to proceed with the restoration.
Restoration Process:
Finding the Springs: To restore the eyes to their original state, two matching pen springs were found. These springs were selected for their suitable size and flexibility.
Trimming and Preparing Springs: The pen springs were trimmed to the required size, making sure to leave a straightened length at one end for attachment purposes.
Attaching the Springs: The straightened end of each spring was then attached under the eye screw, securing the springs in place.
Restoring the Pupils:
Pupil Bead Removal: The pupil beads, held on the upper edge of the eye piece with hot glue, were detached.
Cleaning: All hot glue build-up was meticulously cleaned off from both the eye pieces and the pupil beads, ensuring a smooth surface for reattachment.
Pupil Beads Reattachment: The cleaned pupil beads were glued to the end of the springs, completing the restoration back to the 1976 look.


Stabilizing Paint and Preparing Ribbert's Body:
Initial Paint Stabilization: Applied a layer of varnish over Ribbert’s body. This step was crucial for stabilizing the original paint and ensuring that the new paint could be removed in the future if needed.
Filling Deep Paint Loss: To address areas with significant paint loss, a compound was used to fill in these deep gaps, creating an even surface.
Applying Primer and Paint: After the compound set, a primer was applied. Layers of thinned neon paint were then built up gradually to achieve a solid coverage. This process ensured that Ribbert’s vibrant colors were restored and would shine once more.
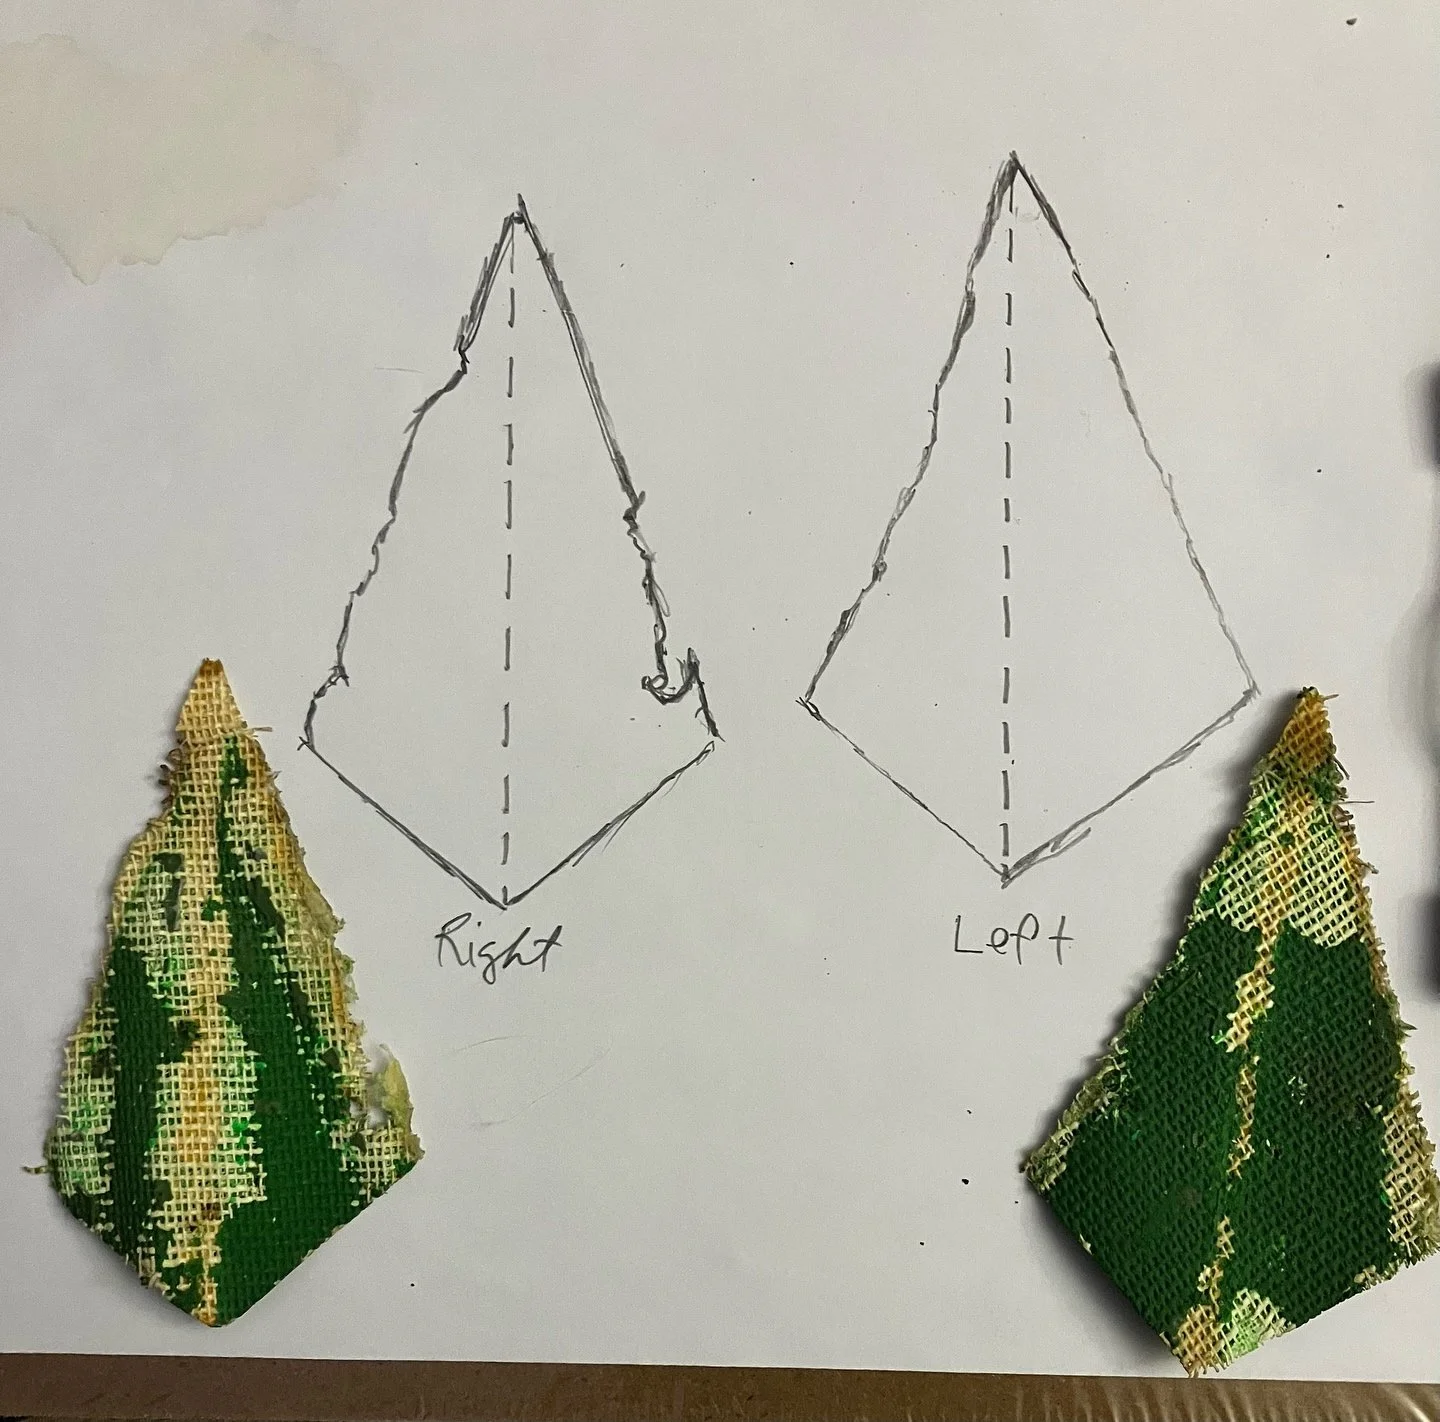
Restoring Ribbert's Feet:
Assessing Original Webbing: The webbing on Ribbert’s feet had a layer of neon paint underneath thick globs of bond-o, suggesting that they might be originals. These were cut from 2 layers of bonded painter's canvas material.
Creating New Webbing: To replicate the original webbing:
Two small art canvas boards were obtained and removed from the cardboard backing.
A little water was applied, and the residual cardboard was scraped off.
The canvas pieces were then dried as flat as possible.
Further Processing: After the canvas dried:
The canvas was laminated together with mod podge and then smoothed over with a roller.
The original webbing design was sketched out, and uneven sides were filled out.
Grain lines were noted, and shapes were plotted on the correct grain before cutting them out.
Once fully cured, a base coat of paint was applied to the webbing.
Addressing Dents and Finalizing the Feet:
Dealing with Dents: Next, significant dents in Ribbert’s right leg were tackled. A sealant was applied to protect the original paint, and then a compound was spread to fill the dents until an even surface was achieved.
Attaching New Webbing: To attach the new webbing:
Mod podge was painted on both the webbing and the toes and allowed to become tacky.
The webbing was pressed into place and held down with clips until it dried.
Additional mod podge was applied along the seams to strengthen the bond.


Paint Prep:
Brush Down: A
Wipe Down: T
Varnish layer: A
Paint Process: To replicate the original base paint:
Base Color: T
Florescent Paint: For a solid layer of color under UV lighting:
T
A
T
Painting the Eyes:
T
T
G
O
Finishing Details:
Body Accents: N
Varnish: N
Costume: (Paying Homage to Vagabond Frog)
M
T
A


